


Planning the Kitchen & Laundry Remodel
Detailing the juicy chaos so that the after photos are more satisfying. And cute and affordable holiday home decor!

As a sleep-deprived parent of a toddler who is also in the first year of running her own business, I am reconsidering my self-imposed deadlines for this passion project. A toddler parent’s writing mantra: write when technically awake, edit only after a night of uninterrupted sleep.
Anyway, before getting started on the first of several kitchen posts, I wanted to share my new set of holiday decor: the holiday home cookie tins from the Target and Marks & Spencer collaboration. (Get the houses and the double-decker bus, skip the dome.) They light up and come with treats. What more can you want from your decor?
— Emily

Our Kitchen & Laundry Room

Ever since I was a kid, it’s been my dream to remodel an old home. My passion for old home restoration began as I watched my Dad renovate my childhood home – also a 1930s fixer – which included watching This Old House on Saturday mornings before gathering supplies for the day’s project together at Home Depot. Since then, I’ve spent hundreds of hours watching HGTV, pouring over interior design magazines and blogs, and adding inspiration to Pinterest boards.
In all my dreams, however, I never imagined that my kitchen remodel project would be done from concept to execution in just a matter of weeks. Today I’ll be sharing where we started. Beautiful interiors are fun to look at, but I’ve always loved learning about the creative problem-solving that made the transformations possible.
Where We Started
We had a galley-style kitchen with an attached laundry room. The kitchen appears to have been updated in the late 1950s and wasn’t in any condition to function for a family today.
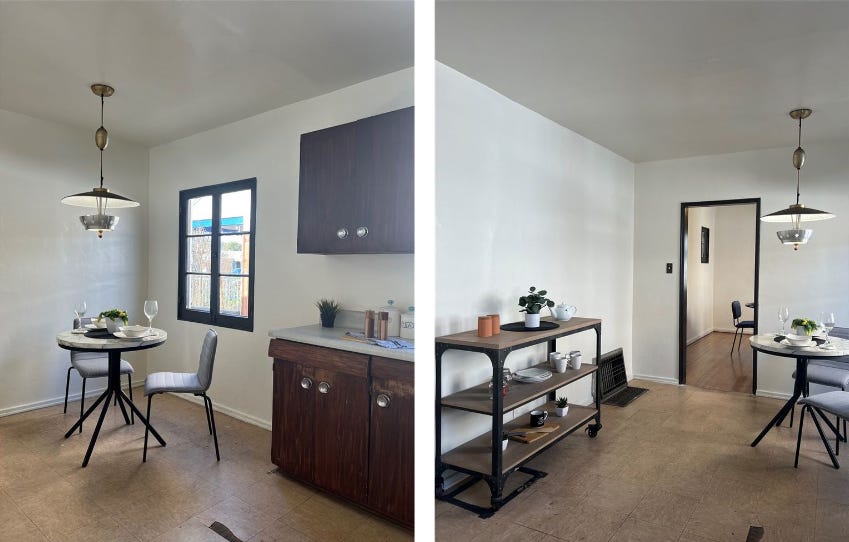
Old, Damaged Fixtures: The laminate counter was cracked and very worn. The cabinets didn’t close properly and had decades of grime on them. Multiple layers of laminate flooring, which we suspected had asbestos, were peeling. In the laundry room, there was a leaking sink that was literally held together with tape and scrap wood.
Plumbing, Gas & Electrical Updates: Unfortunately for us, it was time for the “only needs to be updated once in 100 years” work to be done. We had to replace all of the plumbing, thanking our lucky stars that the leaks hadn’t led to any structural damage. To support a modern kitchen, we had to add outlets and circuits as well as move gas lines and the hood ducting. Not the most glamorous or inexpensive updates, but vital nonetheless.


Wonky Flow: For a well-proportioned space it was, in a word, chaotic.
The laundry room has the only door to the backyard, which was mostly blocked by the washer and dryer.
A hallway closet and old built-ins took up most of the usable space.
There were two superfluous doors, one between the kitchen and the laundry and one between the kitchen and the hallway.
The doorway from the dining room and into the laundry room left walls that were only 23” deep, whereas our current standard countertops extend to 26”.
The entryway into the dining room was very narrow and cut off the flow of the house.
The oven was placed next to a doorway, meaning that when the oven door was opened someone could walk into it unsuspectingly turning the corner from the hallway. For my spatial thinkers, here’s a rough drawing of the space when we started, not including cabinets or built-ins.

As you can see, our only solution was to tear it all out and create a blank canvas.
Demo Day
Can I just say that the first day of demo was a dream come true? My Dad, my husband and I started the misty morning with coffee and breakfast burritos before getting to work. Along the way, we made some fun discoveries, such as an original milk delivery window and a piece of newspaper that was 66 years to the day!


We also had to replace the back door because the original one was missing a large chunk from being rotted. Ah, the joys of home ownership! Thankfully as you’ll see in the above layout, we had a couple extra doors to choose from.
While my initial vision was to DIY as much as possible, that’s pretty tough to do when you have a toddler and don’t have many tools. Plus, in many instances, we didn’t see significant cost savings when you factored in the time, materials, and tools needed. We decided to demo everything (except the floors), paint, and act as the designer and general contractor while hiring out the rest.
What’s Next
Once we had the blank slate, it was time to create a new layout and find inspiration to build the mood board. In the meantime, let me know if you have any questions about the project.
If you enjoyed this, won’t you share it with a friend? Until next time, find more in-the-moment updates on Instagram @heyemilyclaire.
This newsletter may contain affiliate links where I may earn a commission from your purchase. As always, thank you for your support.